


News
Bike Fitting in 3 Simple Steps You Should Know

Jun
Bike fitting is a complex topic as it is related to art and science. The purposes of bike fitting to deliver a comfort, performance and full potential of riding the road bike. To make it easy understandable to everyone, there are 3 key important parameters of bike fitting which is sufficient to establish comfort and performance riding.
Before do that, warm up your body by riding the current adjusted position bicycle. Get a helper (friend, brother & sister), measurement tape, and pendulum string.
Step 1: Saddle Height Position
Ideally, at the bottom of a pedal stroke you want to feel a slight bend in your knee. Aim to come within 80% or 90% of full leg extension or 10 – 20 Degree of bending.
NOTE: A small change of height could affect much on the degree of knee bend. Do it slowly.
Step 2: Fore & Aft Saddle Position
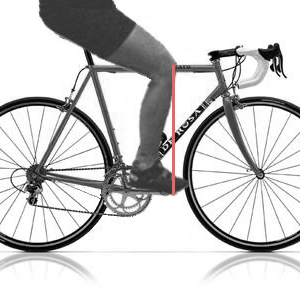
- Put the leg on the pedal
- Turn the pedal crank (at 3 o’clock position) parallel the ground
- put a pendulum string from the knee
- The pendulum ball should meet the pedal axle position
NOTE: If the pendulum ball is far forward from pedal axle, adjust the saddle backward. Else adjust the saddle forward.
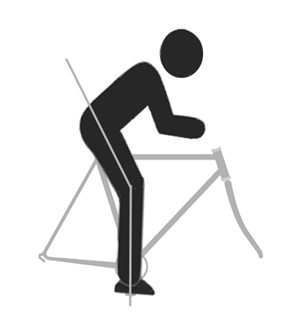
Step 3: Horizontal Body Position

To establish comfort as well as performance. The body angle is 45 degree bend downward to the top tube. Certain cyclist siting position is more steeper (bend more) to create aerodynamic.
Shorter handle stem: Create more comfort / touring riding
Longer handle stem: create more bending of body (aero dynamic)
Extra Tips:
Handlebar width: 400mm, 410mm, 420mm. It is depending the rider preference. Width of the handle should slight wider than rider shoulders.
The most important thing bike fitting is COMFORT instead of following Pro-level bike fitting figures.
References source:
I Love Bicycling
Cycling Tips Australia
Global Cycling Netword
* above mentioned bike fitting steps are just for your own reference.